General tips
Construction of a sidewalk, a driveway, a patio, or stairs is an interesting landscaping project. This sheet explains how to go about it, step by step, and is especially written for beginners. Béton Mobile Sirosol can help you with some practical tips.
The are many common points between construction methods for sidewalks, driveways, patios, and stairs. We provide the general construction methods below adding special comments as needed. There may be local by-laws governing this type of construction; this is something you will have to check in the local building code, or with the building permits department of your municipality. Sidewalks, driveways, patios, and stairs all require the same quality of concrete, and the same finishing textures are usually used on all the surfaces.
Fig. 1. Cracking in concrete sidewalks, driveways, and patios should be controlled by means of well planned joints.
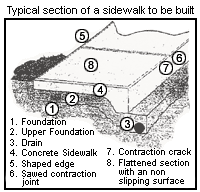
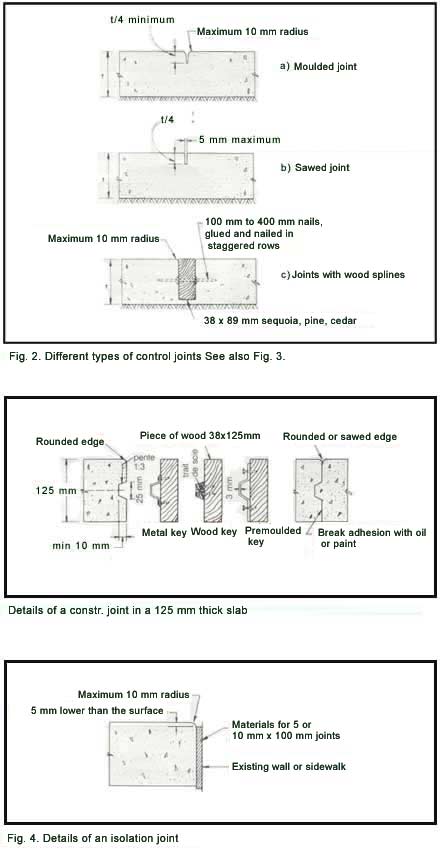
Figure 1 illustrates the layout of various types of joints that enable you to obtain fine-looking surfaces with no cracks.Figures 2, 3 and 4 show the details of these joints. Contraction joints make it possible to control cracking. Use grooving tools on fresh concrete, to score the slab to one quarter of its depth. If it is necessary to make joints in hardened concrete, you will have to use a saw. Isolation joints are used between two different types of constructions, while construction joints are used in places where the concrete placement was interrupted; if these joints are coated with a release agent, like oil, they will play the role of contraction joints.
Planning and preparation
Sidewalks
The width of a sidewalk depends on its location and its use and must be determined according to individual preference, the type of landscaping, how often it is used, local by-laws or the rules of the lending institution. Special care must be taken when choosing the width of the sidewalk, as there is a subtle relationship between its width and its usefulness as well as the appearance of the landscaping.
Sidewalks are usually 100 mm thick, but they should be made thicker if they will be frequently crossed by trucks. For drainage purposes, the sidewalk surface should have a slope of 20 mm/metre.
The panels formed by the control joints should be nearly square in shape. Panels with a length/width ratio that exceeds 1½ to 1 are subject to cracking (fig.1). Isolation joints should be planned for areas where the sidewalk will be in contact with the house, the porch, the driveway, edges, stairs, or other structures. It is not necessary to make isolation joints at regular intervals in a straight sidewalk.
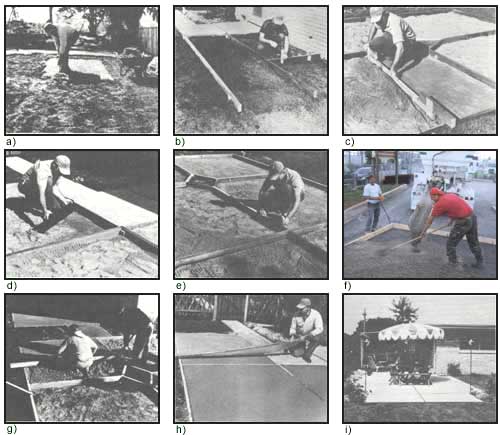
Fig. 5. Steps for making a concrete patio:
a) Strip the topsoil.
b) Install the stakes that will hold the forms.
c) Level the subgrade.
d) Install the material that will make the isolation joints with the other structures.
e) Before placing the concrete protect the strips of wood designed to replace the joints with tape.
f) Photo included
g) Compact the concrete and level it.
h) Cover the finished concrete with polyethylene so that it moist cures.
i) The patio is completed.
Patios
The shape of a patio can vary according to individual taste and imagination: square, diamond-shaped, rectangular, circular, or other (fig. 7). It can be used to highlight shrubs, hedges, or other existing landscape elements. There is a rule that suggests that the patio should be larger than the largest room in the house. A patio slab should be at least 100 mm thick and there should be contraction joints every 3 m in both directions.
Driveways
Figure 6 shows some general features of driveways. For a single car, you should usually plan a width of 2.4 to 3 m; for two cars, it is usually 4.5 to 5.4 m. You should increase the width of the driveway in curves, because the rear wheels have less of a turning radius than the front wheels. If the driveway for a two car garage is short, usually the entire driveway will be made double width; if the driveway is long, it can be single width, making it wider as it gets closer to the garage. Driveways should also have a 20 mm/metre slope for drainage.
A driveway should be 100 mm thick. If oil or other trucks will be driving on the driveway, it would be better to make it 125 mm thick. Transversal contraction joints should have a maximum spacing of 3 m. In the case of a driveway 3.6 m or more wide, longitudinal control joints will also be needed. Longitudinal joints can be reinforced with reinforcing bars to prevent them from opening. We recommend using 900mm long #10M bars spaced at approximately 1 m.
If there is a considerable difference in level over a short distance between the floor of the garage or the parking area and street level, the slope of the driveway becomes critical. It should not exceed 14%. If this slope has to be curved, it must be done as gradually as possible to avoid having the bottom of cars or the bumper scrape the sidewalk or the highest point of the driveway. During the planning stage, you may contemplate enlarging the concrete surface, to increase the parking space, to make a turn-around area, or simply to use as a playing area.
Stairs
When a sidewalk leading to a house entrance finishes in stairs, the stairs are generally a little bit wider that the sidewalk itself. For reasons of comfort and security, a landing should be planned every five or six steps; a landing should be at least 1 m in length. For a staircase attached to the house, recognized requirements are generally as follows: The sum of the dimensions of the tread and the riser should be equal to approximately 470 mm, the riser should not exceed 190 mm, the tread should be at least 280 mm, the dimension of the nosing should be added to that of the tread (fig.8).
When a staircase is further away from the house, people have a tendency to take bigger steps and the rules set out above should be modified as follows: The sum of the dimensions of the tread and the riser should be equal to approximately 660 mm, the riser should not exceed 150 mm, the tread should be at least 300 mm, the dimension of the nosing should be added to that of the tread.
If the stairs are simply used to negotiate a slope in the yard, there is no need for a special foundation. However, if the staircase leads to the door of the house, or if it is connected to a porch with a foundation, it should then rest on a concrete foundation sufficiently deep to escape freezing.
The stairway in figure 9 has lateral walls. The steps are cut into a slope and the lateral walls hold back the earth. Another solution consists of making the lateral walls at the same level as the ground so that the bottom of the riser is at the same level as the ground. This will make it easier to mow the lawn and remove snow from the stairs.
Subgrade preparation
Start by removing a sufficient quantity of earth so that the top of the slab is slightly higher that the adjacent ground. Remove all topsoil, vegetation, wood, large rocks, and any material that is loose or hard to compact. Then backfill with an appropriate material that will provide a uniform subgrade.
The soil is then levelled and compacted using a rammer or a heavy roller to obtain a homogenous density. Obviously these requirements are much more important for a driveway than for a sidewalk or a patio. Use of granular backfill materials such as sand, gravel, or broken stone will facilitate the precision of the levelling. If you are building on clay, you should drench the subgrade several days before pouring the concrete.
Formwork
Lateral forms are often made in pieces measuring 38 mm x 89 mm. These are placed according to the shape chosen and solidly nailed to stakes driven well into the earth. These stakes should not be spaced more than 1.2 m apart and they should be found behind each joint to ensure the formwork is properly aligned.
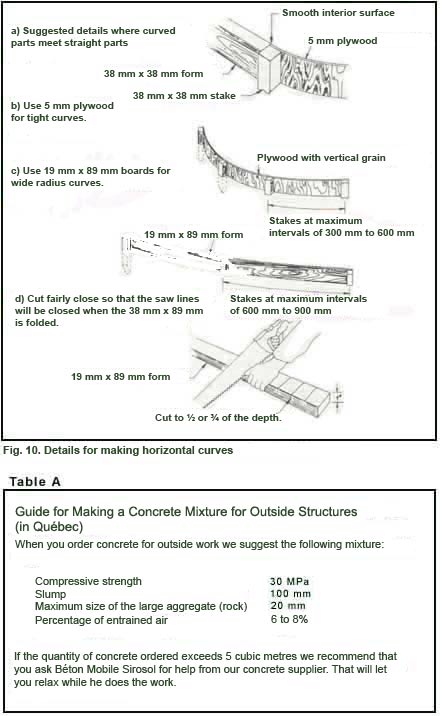
To make horizontal curves, see figure 10. Thick pieces of wood can be curved by sawing them to half or two thirds of their thickness. The stakes should be closer in curves to maintain the shape and level of the forms.
In vertical curves, where a driveway changes slope, short pieces measuring 38 mm x 89 mm should be used to make the form. Use a cord attached to temporary stakes to draw the shape of the curve, then install the form along this line, trying to obtain the most gradual variation of slope possible.
Use construction joints in places where the concrete pour is interrupted. The construction joint shown in figure 3 is equipped with a release agent, it will act as a contraction joint and should be located in the same place as a contraction joint.
After installing the forms, check to see if they can receive the desired thickness of concrete. Use a template, that you slide along the top of the form to level the subgrade material and ensure the concrete is of uniform thickness.
Durability
Advanced studies, in the laboratory and on job sites, have shown that entrained air and a low water/cement ratio are necessary for concrete used for exterior constructions, in order for them to withstand the scaling resulting from freeze/thaw cycles, especially in areas where de-icing salts are used.
It is therefore important to specify the right quantity of entrained air, cement, and water for concrete that is to be used outside.
To order concrete
Do not order more concrete than you can pour and finish in three hours. You will need at least one other person to help you. For large slabs of concrete, it would be best to have two other people helping. If you have no experience in placing concrete, do not order more than 2.5m3 of concrete at a time.
The quantity to order is calculated in m3 adding a 20% margin for unevenness of the subgrade, loss, etc. However, by using the services of Béton Mobile Sirosol, there is no need to justify a 20% margin because our ready-to-use concrete is mixed on site at your request when and where the concrete is delivered. It is best to place your order at least one day in advance.
Table A shows the requirements for mixing concrete. Béton Mobile Sirosol knows the quantities of cement and rocks needed to produce a concrete with a slump that will produce the best workability. In addition, all the components of the mixture, as well as its fabrication and transportation, are governed by national standards that your ready-to-use concrete supplier has agreed to respect.
Place the concrete
Be ready to place, finish, and cure the concrete when the mobile concrete mixer arrives. The concrete must be placed into the forms and compacted or consolidated less than an hour and a half after the water has been added to the mixture. In warm weather, this time period is even shorter.
Water the ground and the forms right before placing the concrete. This way, the concrete will retain its water and will be of better quality. However, there should be no puddles of water or soft muddy areas in the subgrade when the concrete is placed.
You will need a good wheelbarrow to transport the concrete from the bottom of the truck’s chute to where it will be placed. You can rent one from a local construction equipment rental company. The mixer-truck is very heavy and should not back up on a driveway or sidewalk. If you are working in an area that is especially hard to reach, ask the concrete supplier to give you advice on what transportation techniques to use. Placing and finishing the concrete is extremely demanding work, so it’s a good idea to have several strong men on the work site.
Fill the forms right to the top. To compact concrete by hand, use a square spade to tamp down the concrete in the forms. Then slide a rigid board across the top of the forms using a back and forth movement to grade the surface of the concrete and cut it to the desired height.
Repeat this operation a second time to smooth out any bumps that might be there. Before this second pass, you should add concrete to fill in any low areas in order to obtain a uniform surface ready for finishing operations.
Mechanical compacting equipment is usually made up of a vibrator attached to a pair of floats.
Finishing
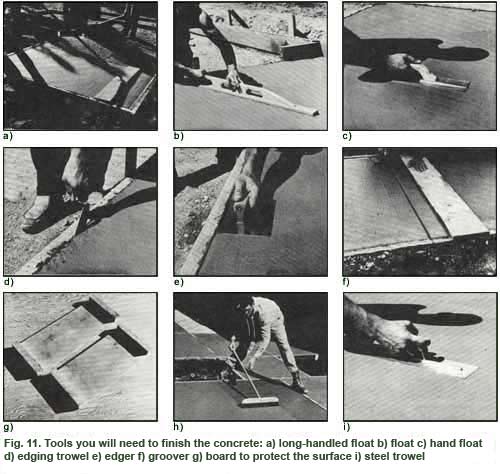
Finishing tools are shown in figure 11 and they are used as described below. Immediately after compaction, pass the float from the front to the back of the concrete surface to make it smooth and eliminate any irregularities. This operation also brings enough mortar to the surface to facilitate finishing.
However, do not overwork the surface, as this may affect its durability. Use a hand float when working on small surfaces.
Immediately after grading, pass a trowel over all the forms to a depth of approximately 25 mm.
Finishing operations on edges and joints and smoothing of surfaces is only begun once the concrete has started to set and there is no more bleed water on the surface.
Finishing should be started when there is no more free water on the surface and the concrete can support the weight of a foot with an imprint of no more than a few mm.
To start, the edges are first shaped with a small radius edger (12 mm or less). The edger should be passed along the length of all the forms, including the pieces of wood that are to be left as joints. If you are using a groover to make joints by hand, the work should be done at the same time as the edges. The edges and joints should be finished at the same time as the surfaces.
Control joints (fig.1 and fig.2) should have a maximum spacing of 3 m in all directions. It is a good idea to indicate the placement of these joints on the forms before starting the placing, using string lines or straight boards.
The joints are made with a groover once the concrete has started to set, with a concrete saw after it has hardened, or by attaching to the forms 19 mm x 89 mm or 38 mm x 89 mm strips of sequoia or cedar that will remain embedded in the concrete. These strips are held in place by wood stakes that should be removed after grading before the concrete hardens. If you plan to remove these stakes, do not nail the strips to them. However, if you are going to leave the stakes in place, you will have to drive them in or saw them off 50 mm below the surface of the finished concrete.
You can choose to keep the relatively smooth texture produced by the float for the final texture without glazing. An attractive finish can be obtained by making circle arcs with the hand float. This final smoothing operation is done after the concrete has started to harden. Install 125 mm x 600 mm boards over the concrete surface so you can walk around and kneel on it. The finisher makes wide circular movements, moving backwards.
If you prefer a rough texture with no float marks, pass a wet broom over the surface. The concrete must be hard enough for the marks left by the broom to remain there. The texture will be more or less rough depending on how stiff the broom fibres are.
If you want a really smooth surface, use a steel trowel after floating. However, a smooth finish is rarely desirable for outside surfaces such as sidewalks patios. We recommend not using this technique in these cases. The reason for this is that when trying to obtain this smooth finish, there is a tendency to grade and smooth the surface too much, before the concrete has sufficiently hardened. All outside construction is subject to extreme temperatures. Premature or excessive trowelling weakens the surface which will then have a tendency to scale, crack, and produce dust.
Wash your tools in water as soon as you have finished.
Special finishes and patterns
In addition to the types of finishing that we have just mentioned, there are a wide variety of possible textures and patterns that can be used to finish concrete. You can colour the surface, either by adding pigments to the concrete mixture, or by exposing coloured aggregate on the surface. You can engrave or stamp geometric patterns in the concrete to give it the look of rocks, bricks, or paving stones. You can create other interesting patterns by embedding pieces of wood in the surface, to make surfaces with very varied shapes: Rectangles, squares, diamonds, etc. There are techniques to produce slip-resistant or shiny surfaces. The possibilities are limitless.*
* See « Finishing Concrete Slabs » Portland Cement Association IS206.T
Curing
Concrete will develop all its strength and resistance if it is cured under carefully controlled conditions. This means that the concrete must be kept continuously moist for a period of at least 7 days. There are various ways to do this:
As soon as the concrete has set, spray it with a hose and cover it with waterproof paper or polyethylene kept in place by weights to prevent evaporation. Another way to keep the surface moist consists of spraying it with sprinklers, flooding it, or covering it with burlap that must be watered from time to time. For work done before mid-September, you can use liquid curing products that form an impermeable membrane on the surface where they are sprayed.
Preparing for the first winter
In addition to adding entrained air and the moist curing period, concrete needs to air dry at least 30 days to develop good resistance to the chemical products used to melt ice. If the season is too advanced to allow this drying before winter, the surface can be sealed with a process that allows the concrete to « breath. » This treatment consists of applying a penetrating sealing material such as boiled linseed oil, silane, silicone, methacrylate, or other.
Related publications
The reader can also obtain the following publications from the Canadian Portland Cement Association:
Concrete for Small Jobs, IS174
Cast-in-place Walls, LT117.B
Cement Mason’s Guide, PA122.H
Removing Stains and Cleaning Concrete Surfaces, IS214.T
Concrete Basement for residential and Light Building Construction, IS208.B
Concrete Improvements Around the Home, PA003.H
Concrete Slab Surface Defects: causes, prevention repair,IS177.T
Finishing Concrete Slabs- Exposed Aggregate, Paterns, and Colors, IS206.T
Painting Concrete, IS134.T
Resurfacing Concrete Floors,IS144.T
Small Concrete Gravity Retaning Walls, IS222.T
The Canadian Portland Cement Association disclaims all responsibility in whole or in part for the application of the principles set out or for the accuracy of any source other than that resulting from work done or information developed by the Association.
Caution: Avoid prolonged contact between skin and wet unhardened cement or fresh concrete. To avoid such contact, it is best to wear protective clothing: gloves, rubber boots, etc. Rinse any areas of the skin that may have been in direct contact with wet unhardened cement or fresh concrete or with any saturated clothing under running water.


